

Monday, 19 July 2010
Sky
I was playing with my new camera the other evening... one of the reasons I like living here is that there is so much sky...

Saturday, 17 July 2010
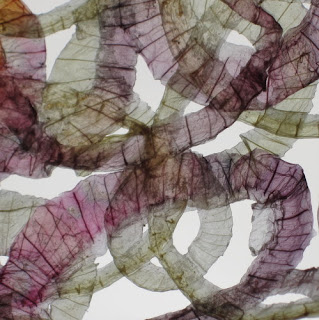
Making 'Paper' from Vegetables
As promised – but rather overdue, sorry! – an explanation of my paper-from-vegetables process. These instructions are for flat paper - and are not terribly precise since this is definitely an experimental, make-it-up-as-you-go-along type of process... Sometimes it works fine, sometimes you do exactly the same thing and it all goes horribly wrong… but then that's what compost heaps are for!
Equipment : You will need some pressing boards (old shelves work well ), lots and lots of newspaper, and some cloths – I used the cheapest of cheap J-cloths.
Next, choose your vegetables. I have been most successful with courgette, carrot (sliced or grated), onions and red cabbage (good but smelly!). Leeks and celery can work but are a bit temperamental. I tried a yellow pepper which didn’t work at all, although I think it might if I skinned it first… or sliced it into strips… Anything too watery probably won’t work and shiny skins like that on the pepper are a problem. But there are lots of veggies I haven’t tried yet which will probably work really well – so experiment!
Step 1 : Slice your chosen vegetable whichever way you want. The slices do not need to be particularly thin or even – in fact, slices which are too thin will make your resulting paper terribly fragile. Boil the slices until they are just soft but not disintegrating – how long depends on the vegetable and the thickness of the slices – 3-5mins is about right for most things. Drain.
Step 2 : Lay a cloth on top of a pad of newspaper, on top of a board. Arrange your drained vegetable slices on the cloth, overlapping the slices by about 5mm. You can see from the photograph that the courgette slices were really quite thick. I was making lots of little separate pieces here so I haven't overlapped them much.

Lay another cloth on top and another pad of newspaper on top of that. If you have more vegetable slices you can lay another cloth on top and repeat, topping off with a last layer of newspaper and another pressing board. Weight it all down with a stack of books or whatever else you have to hand.

Step 3 : The vegetables are very wet at this stage, so after an hour or so you will need to replace all the newspaper with dry newspaper. This is important because if you don’t get rid of the moisture your veg will go mouldy before it dries. You can now leave your vegetables pressing for a few hours or overnight.

Step 4 : Your vegetables should be paper thin by now, sticking together and beginning to dry out. Renew the cloths by carefully peeling the top cloth off and replacing with a clean one. Flip the cloth-veg-cloth sandwich over and carefully peel off and replace the other cloth. If you don’t replace the cloths at this stage you may find your veg paper gets irretrievably stuck to them. Restack with fresh newspaper between the pressing boards.

Repeat step 4 a couple of times a day until your vegetable paper is dry. This can take up to 3 or 4 days depending on the moisture content and thickness of the vegetables, how heavy the weights are, and so on.
And then you’re done! The vegetable paper can be left as it is, or coated with a sealant such as shellac or acrylic wax. I found the acrylic wax made the otherwise quite brittle paper really flexible, but also very shiny, which I didn’t like so much. Shellac is less shiny and worked really well on the red cabbage but would discolour a paler vegetable. I have no idea how long the paper will last or how long it will keep its colour - I will keep you updated.
So, have fun experimenting, and if you make some vegetable paper, send me a picture, I'd love to see!
.JPG)

Thursday, 8 July 2010
Labelling part 3
Did I mention how much I love the stamp I got from Clare of LittleGreyClouds? (Find her here on etsy and here on folksy.) I'm sure I did! Anyway, after all the recent excitement I was feeling a bit worn out and not really up to making new stock so I played around with my stamp, some nice sheets of recycled card and some left over scraps of ribbon and yarn. And these are what I made...


Wednesday, 7 July 2010
And the Winner is...
...courtesy of random.org... Scarlett! Scarlett chose this lovely combination of colours - vanilla, peppermint green and plum fizz.

I would like to thank everyone who took the time to enter and tell me their favourite colour combinations - it has been both interesting and really useful for me. And as a thank you I will be offering you all a 15% discount on the purchase price of ffflowers in both my etsy and folksy* shops.
Just type the code 'FFGA0710' in the etsy 'message to seller', or put it in the paypal 'notes to seller' for folksy, and I will refund 15% of the purchase price (excluding shipping) via paypal.
The discount is available on ffflowers orders placed up until 9pm BST on 19th July 2010 (including pic-n-mix bouquets but excluding other custom orders).
*sorry the discount does not apply to non ffflowers items in my folksy shop
Monday, 5 July 2010
Summer Exhibition
Just a quick post to let you know that I will be hanging my veggies tomorrow in my textile group's summer exhibition at Castle Park Arts Centre in Frodsham (Castle Park don't seem to keep their website up-to-date but it's good for directions and opening times!). The exhibition is on from 7th July to 16th August - check the here for opening times. There are loads of lovely pieces in the exhibition - well worth a visit if you're in the area.
And I have been playing with my new camera - discovered a whole new level of zoom so I will have some lovely close up shots of the vegetables to hang as well. Sneak preview here...


And I have been playing with my new camera - discovered a whole new level of zoom so I will have some lovely close up shots of the vegetables to hang as well. Sneak preview here...

Red Cabbage

Onion Rings

Carrot
PS Have you entered my giveaway yet? Ends Wednesday 7th July 9am BST - so don't delay!
Subscribe to:
Posts (Atom)