Showing posts with label textile art. Show all posts

Tuesday, 28 June 2011

Reworking ancient history

Having decided there was something not quite right about the old sample I found the other day, I couldn't resist trying to improve it.

I released it from its card backing and took off the strange not-quite-button things and replaced them with real buttons from my stash.

I think it's an improvement... I'm not sure what to do next though!


I don't think it wants to go back on the cardboard - I think it needs a jazzy border and more of a mini-quilt sort of feel.  So I've had a good dig around in my fabric stash (there really is a lot of it)...

I,m still not sure... something like this maybe... (although probably a bit more random, knowing me...)


Or perhaps something a bit more restful?


I shall think about it. Because of course, this is not what I should be doing... I did make this, inspired by all these rich colours... it will be up in the shops soon.

Saturday, 25 June 2011

Ancient History

Ancient historyI've been clearing out. So much fabric - some of it has to go!

I found a box of pieces saved from my City & Guilds Embroidery course days - I had forgotten about these two. I'm wondering whether to remount them - maybe wrap them around a little canvas - and put them in the shop? What do you think?

Ancient history


I always liked the darker one (I hope the picture isn't too dark) but was less sure about the pink and orange one - a bit too bright for me - but it is fun!

It does seem a shame to have them stashed away in a box never seeing the light of day.


Beachcombing ISomething else that I found was this piece.  This was a sample I did when I was learning how to do shisha embroidery - can you see the little mirrors?  But, they're not all mirrors, there are shells and pieces of slate and sea glass in there.  This was the beginning of my journey into sewing bits picked up on the beach onto my work.

Beachcombing I (detail)


Such a lot has come from this piece!  I made 3 pieces at the time, all quite different but all with shells and/or sea glass stitched onto them.  My sister has one of them, the other piece was the first piece of my work I ever sold.  What a thrill that was!

I saw some nice white frames in John Lewis the other day, I think I might remount this one and put it on my wall.

Did I ever tell you how/why I started collecting things on the beach?  You see, I don't much like building sandcastles so I needed to look busy... such a bad mother...!!

Wednesday, 15 June 2011

Making textured paper backgrounds... part 2

So, if you've followed the first part of the tutorial you should have ended up with one or more curly and not-very-exciting bits of papery stuff like this...


Now we need to colour them.  The colour needs to be transparent, so a dye based colour or watercolour or even very dilute artists acrylic should work.  I use Brusho which is a fun little pot of dye based powder colour which you can get all sorts of interesting effects with.  To get the shade of blue I like, I use the black (yes, black!) Brusho, mixing a sprinkle of powder with lots of water to make a very dilute colour.  I can't tell you how much of each because I don't measure it, I literally do just sprinkle.  But for this, the more watery the colour the better, you can always add another darker coat later. The idea is that the colour from the base paper should show through just enough to make it interesting.


These have had a wash of the dilute colour applied.  You can still see the underneath coloured paper a bit too much but don't be tempted to add more colour, they will tone down as they dry.  If you still don't like the effect once they are dry, by all means add more colour then.  And of course, you don't have to use blue, you can use whatever colour you like!


And here they are nearly dry - you can see that the underneath colour has toned down a lot and the wrinkles in the tissue paper soak up the top colour to make darker streaks.

When they are completely dry they will probably curl up again. At this point I just flatten them with a cool iron.


Take a look at your work.  Do you like the way the base paper shows through?  One of my pieces (bottom left) had a very definite line down it which I didn't like, so I sponged some white acrylic paint over it and voila, no more line!

If you are making a bigger piece I would definitely recommend sponging some areas with acrylic paint in your choice of colour to add interest.

Once that has dried we get to the really fun bit - adding all the little bits of texture on top.  It helps if you have amassed a collection of interesting bits and pieces like I have, but really, anything will do.  Silk fibres work nicely, but so do threads pulled from the edge of fraying fabric.  I love plasterer's scrim but I have also used shredded pieces of the netting bags that you get fruit in.

Here's a selection of what I use - there are some silk fibres in there and the sparkly stuff is Angelina but a lot of them are just scraps - whenever I cut the edge off something and it's the right colour scheme for my cards it goes into the box.  And I save the little tangle mess of thread ends that accumulate when I'm doing a sewing project... sad, I know...  I have heard that lint from a tumble drier is interesting but I don't have one.  Probably just as well!

So what I do is look at the background in front of me, look at the box of scraps, pull out something that looks like it might work and stick it on.  I like to use acrylic matte medium to stick the bits because it doesn't leave a shine and seems to stick pretty much anything.  You could use PVA, that does tend to make the paper a little shiny, it depends on the effect you are after.

Work in progress
Nearly finished...

Once I've stuck something on I decide whether that's enough, or I might stick another piece of something on.  Or I might spray or spatter it with some ink - pearlescent is nice.  And because I am working with a seashore theme, on most of my pieces I add a little puff paint because I think it looks like flecks of foam.  Puff paint is weird stuff that expands and puffs up when you heat it with a heat gun, but he warned, less is more!  It's very easy to obliterate the whole thing with little white blobs!

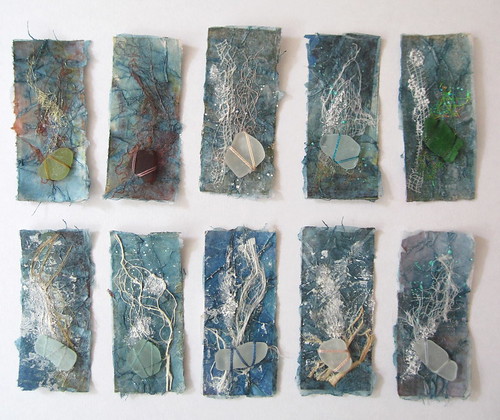
And here are the finished pieces, complete with puff paint on some and each with their own piece of sea glass.

Ready!

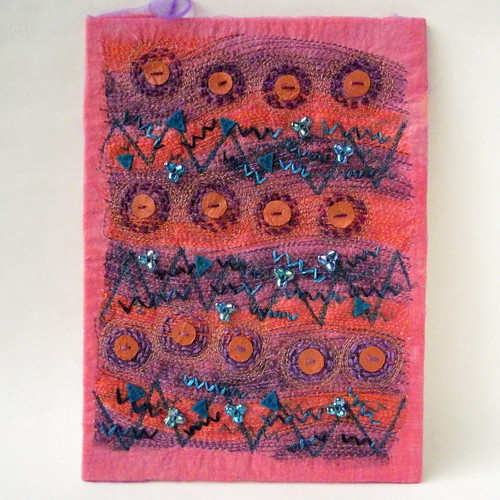
I have shown you how I make the toppers for my cards but I originally developed this technique for a series of much larger pieces (sorry the photo is a bit dark - do click to see it bigger).

Sea Strand I


If you are working on a larger scale than the cards and want to include a lot of stitching on the piece I recommend you back it with an iron-on interfacing for extra strength. It's best to do this before you add puff paint if you are using that, otherwise it can get a bit flattened.

And there you are! If you have any questions, do leave them in the comments below and I will try and answer them. And if you do try it out, I'd love to see what you make!

Monday, 13 June 2011

Making textured paper backgrounds... part 1

As promised, I'm going to take you through how I make the textured paper backgrounds for my seashore art pieces. It's not difficult, and I find the best thing is not to try and plan it too much, but just go with the flow - which suits me just fine!

You will need :
  • an old plastic carrier bag
  • fine cotton fabric (e.g. muslin/cheesecloth)
  • pages torn from a colour magazine
  • white tissue paper
  • glue - PVA or wallpaper paste
  • a paintbrush
To start with you will need to cover your work area with a layer of plastic - I usually just open up a plastic carrier bag and use that. Make sure it doesn't have any holes in it!


Because I stitch into these backgrounds, the first layer I use is fabric, cut roughly to the finished size of the piece, to give it some strength. A fine cotton muslin (cheesecloth) works best - it takes the glue well and is fine enough so you don't really notice it.  Spread the fabric on the plastic and dampen it to keep it in place.  Spread a layer of glue on top.


The next layer is simply torn paper from a colour magazine (I like the weekend Telegraph magazines because the paper is a nice thickness - sadly that is not regarded as a good way to choose the household reading matter!). Choose pieces with interesting colours or patterns on them - the colours can be quite different from the final colour of the piece.  In fact, in some ways, the more contrasting the colours the better.  As these pieces are for my cards they are quite small so I'm only using one piece of paper, torn to size, for each.  If they were larger I would build up a patchwork of torn pieces.  Crumple up the paper to take the shine off it, then open it out and press it on top of the pasted fabric.

The final layer is tissue paper.  Tear a piece of tissue paper a little larger than the paper you want to cover.  Spread another layer of glue on top of the coloured paper and put the tissue paper on top.  Using a wet paintbrush, push the tissue paper around a bit to make wrinkles and to bring the edges in level with the coloured paper underneath.  Don't worry if bits stick out, you can either leave them or tear them off when it's dry.  Press it down to make sure you flatten all the wrinkles and the tissue paper is soaked through.


Again for a bigger piece you can use a patchwork of pieces of tissue, but don't layer it up too thick because you still want to be able to see the colour from the paper underneath.

And that's it for the first stage - now you just need to leave the whole lot to dry.  It will probably curl up but don't worry about it!  I know they don't look much at the moment, but don't worry, they will.  You will need to come back for the second part of the tutorial!

Wednesday, 23 March 2011

A pair of shoes


I finished the other shoe - this one is made from teabags - now I have a pair!

Sunday, 20 March 2011

Shoemaking

This weekend I was lucky enough to attend a fantastic workshop with the very talented Jennifer Collier.  We spent the morning trying out all sorts of different techniques using recycled bits and bobs to make samples of - what would you call it?  Material?  Paper?  Fabric?  Anyway, we bound all the samples together in great little books for future reference.


On the left here you can see all sorts of bits and pieces trapped in (empty!) teabags held together with wax.  On the right are some bits and pieces in a sandwich bag which has been ironed to hold it together, and behind that another teabag, this time using latex to hold it together.


On the left here I have various bits trapped between 2 layers of pattern tissue paper with wax and on the right, an image from a magazine transferred onto sellotape.

In the afternoon, we each chose one of the materials we had experimented with in the morning, put together a larger piece and made a little shoe from it.  So sweet!  I have another one cut out and ready to sew so eventually this shoe will have a not-quite-matching partner.


I thoroughly enjoyed the whole day - there was just the right amount to do without feeling too rushed.  If you get the chance to attend one of Jennifer's workshops I recommend you sign up straight away - or maybe visit her new gallery Unit 12 which is just outside Stafford.

Sunday, 17 October 2010

Weaving

Yesterday the textile group I belong to were lucky enough to have Sue Lawty as a visiting tutor.  Sue is an amazingly inspiring and generous teacher and her work is fabulous - do go and have a look.  I have done a little bit of weaving before but not 'proper' tapestry weaving.  Usually after one of these days I am far too tired to do much in the evening but yesterday, tired or not, I was back on the weaving the minute I got home!  Here is my little sample, not much, it is only 2" wide and I have been using fine threads so it grows very slowly.


I don't really have a plan for it, I am experimenting with combining different fine threads together at the moment to see the effect I get.  Then I want to try using grasses, and wire, and...  I am finding it totally addictive!

LinkWithin

Related Posts with Thumbnails