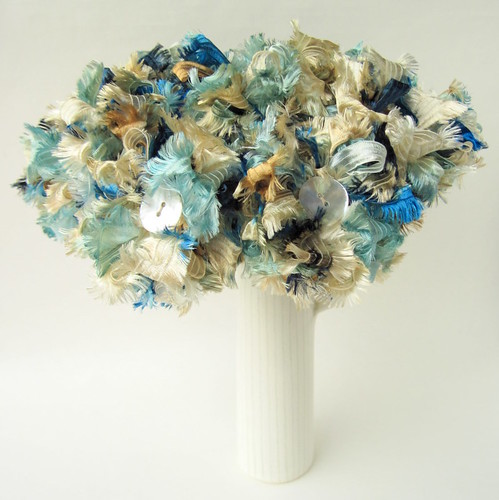
I think of all the different colour flowers I make, these are probably my favourite. I was quite sad to pack this lovely lot up today to ship them off to their new home.
Sea Breeze ffflowers available here.
Showing posts with label flowers. Show all posts
Wednesday, 3 August 2011
Wednesday, 20 April 2011
ffflowers update
I've been away for a few days looking after my mum (new hip, doing very well thank you!). So it was a lovely surprise when I got back to find that I am a featured seller on Folksy this fortnight - thank you very much Folksy people!
I've also been working on a couple of new colours of flowers - one in a soft apricot ribbon with a pale yellow button centre
and one in a pretty lilac ribbon with a natural shell button centre.
I do think they look rather good together! Coming soon to both my Folksy and Etsy ffflowers shops.
I've also been working on a couple of new colours of flowers - one in a soft apricot ribbon with a pale yellow button centre
and one in a pretty lilac ribbon with a natural shell button centre.
I do think they look rather good together! Coming soon to both my Folksy and Etsy ffflowers shops.
Wednesday, 2 March 2011
New Hairbands
They will be available in my etsy ffflowers shop very soon.
Wednesday, 15 September 2010
Re-Wired Flowers
I have a lot of things left over from various projects we did during my foundation course, including a whole pile of broken electrical items. I was tidying these into a box the other day when I noticed the outer covering was peeling off one of the communications cables - so, always willing to be distracted from tidying I peeled it off a bit more... Inside was a rainbow of thin wires all twisted together with a strand of bare copper - irresistible!
It took me a while to separate the wires - there is a knack to it which I didn't get the hang of until I had nearly finished, but it was worth persevering. Of course my first thought was to try the wires as flowers and I'm pleased with the result.
I separated the rainbow of wires into 2 colour groups and also included the bare copper wire in the blue flower for a bit of added sparkle.
I think I am going to list these in my new shop even though they are flowers, as they would probably get a bit lost in my ffflowers shop.
Now what shall I do with the rest of the box?
It took me a while to separate the wires - there is a knack to it which I didn't get the hang of until I had nearly finished, but it was worth persevering. Of course my first thought was to try the wires as flowers and I'm pleased with the result.
I separated the rainbow of wires into 2 colour groups and also included the bare copper wire in the blue flower for a bit of added sparkle.
I think I am going to list these in my new shop even though they are flowers, as they would probably get a bit lost in my ffflowers shop.
Now what shall I do with the rest of the box?
Wednesday, 16 June 2010
New Blue Eco Daisies
During my grand clear out the other day I found a couple of pretty blue plastic carrier bags, so of course those have been turned into flowers too... 1 carrier bag = 3 flowers so these are definitely a limited edition!
I'll be listing them in my etsy ffflowers shop later, probably as 2 separate bunches, but then I do think they look lovely mixed together so I'm a bit undecided about that - what do you think?
Friday, 21 May 2010
Daisy Chains
Did you ever make daisy chains? Carefully splitting the stems and threading each flower through the next? This crown is a more durable version of those delicate daisy chains - great for a summer party or dressing up - or even every day wear for a girl of a certain age!
Friday, 30 April 2010
Recycled Paper Flowers
As I was wandering the web I came across this amazing video of a technique called ‘origami crumpling’ developed by Vincent Floderer. Of course, being me I had to try it out; here is my first attempt using tissue paper – I dipped the base into Brusho and let it bleed up the paper to get the colour.
But then I wondered what would happen if I used just any old paper, and started with a page torn from a magazine. The result was so much like a flower that I kept going until I had a bunch of them – aren’t they great?
To make these flowers I used a simplified version of the origami crumpling technique. Start with a page torn from a magazine and tear a strip off it to get a square – you don’t need to be too precise. It is a good idea to choose a page with a bright colour on one side only to start with, so you know which way up you are – this will be the inside of the flower.
Step 1
With the brightly coloured side of the paper on the outside, fold the square in half and then in half again to get a quarter size square.
Step 2
Now fold your quarter size square in half crosswise, open it out, fold it in half the other way and open it out again. Turn it over and repeat the process, folding diagonally this time.
With a bit of pinching of the folds you should have a star shape like this.
Step 3
Hold your star shape by the tip and squeeze the paper together so you end up with something like this.
Step 4
Open out your crumpled star and unfold one of the original folds. You will have one point pointing up, and one pointing down. ‘Pop’ the downward point up so you have something like this.
Put your 2 points together and squeeze, just like you did in step 3. You can roll the paper gently between your hands to help with the crumpling.
Step 5
Open your paper right out. You will have 2 points pointing up and 2 pointing down. With the bright side of the paper facing up, ‘pop’ the upward points down so you have this.
Turn it over and pinch all 4 points together (like making a fortune teller/cootie catcher – remember those?) and repeat the crumpling/rolling one last time. Gently open out your flower.
I have pushed some thin 18” canes into the centre of my flowers to make stems; I think those green plant support canes would do pretty well too. The stems stay put quite well but you could add a bit of glue or double sided tape if you wanted to.
And there you are – a bunch of flowers for next to nothing! When you get bored of the colour, or they get dusty or faded, just recycle the paper and make some new ones! I think they are a great idea for low cost eco-friendly party decorations. And of course if you wanted to go all sophisticated you could use proper origami paper, or wrapping paper – the possibilities are endless… recycled yellow pages might look good… or pages from the Financial Times… This ball is made from 6 of the 'flowers' glued together with string threaded through the centre.
If you enjoyed the video, do take a look at this one where Vincent Floderer makes the most amazingly realistic mushroom out of tissue paper!
But then I wondered what would happen if I used just any old paper, and started with a page torn from a magazine. The result was so much like a flower that I kept going until I had a bunch of them – aren’t they great?
To make these flowers I used a simplified version of the origami crumpling technique. Start with a page torn from a magazine and tear a strip off it to get a square – you don’t need to be too precise. It is a good idea to choose a page with a bright colour on one side only to start with, so you know which way up you are – this will be the inside of the flower.
Step 1
With the brightly coloured side of the paper on the outside, fold the square in half and then in half again to get a quarter size square.
Step 2
Now fold your quarter size square in half crosswise, open it out, fold it in half the other way and open it out again. Turn it over and repeat the process, folding diagonally this time.
With a bit of pinching of the folds you should have a star shape like this.
Step 3
Hold your star shape by the tip and squeeze the paper together so you end up with something like this.
Step 4
Open out your crumpled star and unfold one of the original folds. You will have one point pointing up, and one pointing down. ‘Pop’ the downward point up so you have something like this.
Put your 2 points together and squeeze, just like you did in step 3. You can roll the paper gently between your hands to help with the crumpling.
Step 5
Open your paper right out. You will have 2 points pointing up and 2 pointing down. With the bright side of the paper facing up, ‘pop’ the upward points down so you have this.
Turn it over and pinch all 4 points together (like making a fortune teller/cootie catcher – remember those?) and repeat the crumpling/rolling one last time. Gently open out your flower.
I have pushed some thin 18” canes into the centre of my flowers to make stems; I think those green plant support canes would do pretty well too. The stems stay put quite well but you could add a bit of glue or double sided tape if you wanted to.
And there you are – a bunch of flowers for next to nothing! When you get bored of the colour, or they get dusty or faded, just recycle the paper and make some new ones! I think they are a great idea for low cost eco-friendly party decorations. And of course if you wanted to go all sophisticated you could use proper origami paper, or wrapping paper – the possibilities are endless… recycled yellow pages might look good… or pages from the Financial Times… This ball is made from 6 of the 'flowers' glued together with string threaded through the centre.
If you enjoyed the video, do take a look at this one where Vincent Floderer makes the most amazingly realistic mushroom out of tissue paper!
Subscribe to:
Posts (Atom)

