Since I enjoyed stitching onto my collagraph prints I was inspired to do a bit more hand stitching.
I found 5 Seashore ACEO backgrounds that I'd made ages ago and never stitched, and decided to finish them off. I made quite a few of these a while back - I have a whole set of them over on my flickr if you'd like to browse, most of them have gone off to new homes now. I checked and the last time I actually made any of these was in February 2009 so they are a bit of a rarity!
I've finished 3 already...
and I have another 2 lined up ready to go...
That's it for the backgrounds already made. I've found the stitching very relaxing so I hope it won't be another (nearly) 3 years before I have time to make more. But then there are so many things I want to do and so few hours in the day...
These ones will be appearing in my hypsela shop on Etsy over the next few days.
Showing posts with label natural materials. Show all posts
Thursday, 17 November 2011
Wednesday, 26 October 2011
First bundle

I've managed to last a week before opening one... I chose the second from the left to unwrap - I just had to open one of them to see what had happened!
This one is a strip of old sheeting. Here are the leaves that came out of it - no longer the lovely dark red they were!

It will be interesting to see how much of the colour stays when it dries and whether it fades quickly or not.
I'm leaving the others a bit longer... not sure quite how long before I can't resist opening them!
Wednesday, 19 October 2011
A new project
I know, I must be mad starting something new... but I am thinking ahead because I will need a project to show with my textiles group and I am trying not to be too last minute this year! Our theme is 'Collections' and it seemed to me to be the perfect opportunity to try something I have been thinking about for a while.
I have been dying cloth for my embroidery with tea for a long time but I first became interested in dying cloth with other natural materials when I was making my vegetable paper. I noticed that the brighter vegetables stained the pressing cloths, and some colour remained even after washing. And sometimes when I re-used the washed cloths the vegetable colour in the cloth would affect the colour of the new vegetable paper, so the veg dyed the cloth which in turn dyed the veg... A little while later I discovered India Flint and was completely awestruck by her work, if you don't know of her do go and check it out.
So I am going to do a series of experiments, bundling cloth with natural materials and other things that I collect (the shoreline turns up some interesting bits of rusty metal at times...). Cooking it, leaving it, maybe even burying it, I'm not expecting spectacular results, I'm just interested to see what happens. The bundles will be a personal record of my year. And since the best thing I can do with my bundles is be patient and leave them alone I hope the project will fit in with the madness that is my life at the moment!
I've started with a few leaves picked up in my local park, wrapped in some well worn upcycled cotton sheeting, some butter muslin and a piece of my wedding dress silk (what do you mean it's not normal to cut up your wedding dress?!)


They simmered away for a couple of hours in some (rather murky) rainwater in an old aluminium pan which I'm sure must have come from my grandmother, if not even from her mother. And now I shall leave them for a while. I wonder how long I can manage before I can't resist opening at least one little bundle?
And, I had some lovely roses for my birthday last week.
It would be a shame to let all those leaves go to waste... I'm not sure if the petals will do anything, but no harm in trying!
I have been dying cloth for my embroidery with tea for a long time but I first became interested in dying cloth with other natural materials when I was making my vegetable paper. I noticed that the brighter vegetables stained the pressing cloths, and some colour remained even after washing. And sometimes when I re-used the washed cloths the vegetable colour in the cloth would affect the colour of the new vegetable paper, so the veg dyed the cloth which in turn dyed the veg... A little while later I discovered India Flint and was completely awestruck by her work, if you don't know of her do go and check it out.
So I am going to do a series of experiments, bundling cloth with natural materials and other things that I collect (the shoreline turns up some interesting bits of rusty metal at times...). Cooking it, leaving it, maybe even burying it, I'm not expecting spectacular results, I'm just interested to see what happens. The bundles will be a personal record of my year. And since the best thing I can do with my bundles is be patient and leave them alone I hope the project will fit in with the madness that is my life at the moment!
I've started with a few leaves picked up in my local park, wrapped in some well worn upcycled cotton sheeting, some butter muslin and a piece of my wedding dress silk (what do you mean it's not normal to cut up your wedding dress?!)
They simmered away for a couple of hours in some (rather murky) rainwater in an old aluminium pan which I'm sure must have come from my grandmother, if not even from her mother. And now I shall leave them for a while. I wonder how long I can manage before I can't resist opening at least one little bundle?
And, I had some lovely roses for my birthday last week.
Sunday, 31 July 2011
Transparent Carrots
Do you remember my carrot paper? It was really very bright orange...
It has been hanging in my Mum's house for a while and one year on it looks like this...
No mould, and it hasn't gone too brittle... the colour has faded in parts and gone a rich dark brown in others. Fascinating!
See my other vegetable papers here and if you fancy having a go yourself there is a tutorial here.
Tuesday, 22 February 2011
Experiments with Basket Weaving
I belong to a lovely textile art group - we meet once a month and have workshops from visiting tutors and try out all sorts of different techniques. At the last session we looked at different traditional basket making techniques. We were shown how to make simple woven baskets from paper - I had a go at home with strips cut from a paper carrier bag. It was a bit fiddly but I was chuffed when I finally got them to hold together!
I have long admired the little baskets made by SewDanish on Etsy - I am even more in awe now I know how fiddly they are - hers are so much neater than mine! I think I need more practise. A lot more practise.
During the session on Saturday I worked on using a traditional knotting technique - not to make a basket, but to cover a rather nice piece of driftwood I had in my bag. And of course I had to add a few of my favourite shells... I really enjoyed this, it was a very calming process and I'm pleased with the result. Makes a nice sound when you shake it too!
The coloured thread is all waxed linen thread. It is a bit strange and sticky to work with but makes really satisfying knots, and I love the subdued colours. There is a bit of a problem with this stuff though; it is apparently made in Northern Ireland - it says 'Crawfords Belfast' as clear as anything on the label - and yet it seems you can only buy it in the US. It's not cheap and by the time you've added on shipping, VAT and the good old Royal Mail handling fee it's going to be exorbitant. So if anyone knows where you can get it this side of the pond do please please let me know.
I have long admired the little baskets made by SewDanish on Etsy - I am even more in awe now I know how fiddly they are - hers are so much neater than mine! I think I need more practise. A lot more practise.
![]() |
Basket by SewDanish |
![]() |
Basket by SewDanish |
During the session on Saturday I worked on using a traditional knotting technique - not to make a basket, but to cover a rather nice piece of driftwood I had in my bag. And of course I had to add a few of my favourite shells... I really enjoyed this, it was a very calming process and I'm pleased with the result. Makes a nice sound when you shake it too!
The coloured thread is all waxed linen thread. It is a bit strange and sticky to work with but makes really satisfying knots, and I love the subdued colours. There is a bit of a problem with this stuff though; it is apparently made in Northern Ireland - it says 'Crawfords Belfast' as clear as anything on the label - and yet it seems you can only buy it in the US. It's not cheap and by the time you've added on shipping, VAT and the good old Royal Mail handling fee it's going to be exorbitant. So if anyone knows where you can get it this side of the pond do please please let me know.
Monday, 21 February 2011
Jewellery - Metalwork
The last stop on our trip round the departments was the Jewellery-Metalwork department. Our brief for these 2 weeks was to create a ring. I had great fun here - I had really been looking forward to having the chance to mix some of my favourite textiley fibres with some metal - and ended up making several ring-like things!
First off I loosely needlefelted some bits of fluff together - a mixture of wool and silk and linen fibres - and textured a little piece of copper to sit on top of them. Now obviously I couldn't do any soldering with this little lot around without them going up in flames so I made the ring separately and then riveted the fluff and metal onto it. A bit fiddly, to say the least!
Having made these 'proper' rings I went on to have fun experimenting with my favourite combination of silk paper and wire. I already use these materials to create the hearts I sell in my hypsela handmade shop but I had never managed to form the silk paper over a 3D wire structure without just getting into a sticky mess. I twisted some wire into loose spirals to fit over my fingers and got out the silk paper... well the first couple of goes were my usual sticky mess, but evetually I discovered if I laid the silk fibres in the same direction as the wire it worked! (well, sometimes...)
I know, a pretty strange sort of ring but a great discovery for me! And lastly, another weird and wacky ring-thing made using the same technique... There's no stopping me now!
First off I loosely needlefelted some bits of fluff together - a mixture of wool and silk and linen fibres - and textured a little piece of copper to sit on top of them. Now obviously I couldn't do any soldering with this little lot around without them going up in flames so I made the ring separately and then riveted the fluff and metal onto it. A bit fiddly, to say the least!
Next I got out one of my very favourite fibres. This is beaten kozo fibre, I think it is from the bark of the mulberry tree, and it has been prepared for papermaking. It comes as funny little sticks but if you soak them you can gently tease them out into the most amazing lacy structures, which are quite stiff once they dry. It can be a bit hit-and-miss if you want a particular size and shape, you never really know what you're going to get, but it's always beautiful. I threaded my kozo pieces onto wire which had been soldered onto a ring to create this lovely pod shape. This is definitely my favourite!
I do need to find a neater way to finish the wires together at the top though - again, soldering is out - maybe I just need to practice my wire-wrapping!
I know, a pretty strange sort of ring but a great discovery for me! And lastly, another weird and wacky ring-thing made using the same technique... There's no stopping me now!
Monday, 29 November 2010
More Weaving
I have been stuck at home today with a cold, feeling sorry for myself. Well enough to want to do stuff but not really well enough to do anything much... and bored! I did take some photos of some little weaving experiments I did the other week - not very good pics because of a certain lack of light at the moment - but here they are anyway.
The first sample I made, I was experimenting with including strands of a fine copper thread to add a bit of sparkle - very subtle and doesn't show too well in the photo, you can see better if you click on the image for the larger version. Part way through I decided it needed a bit of green - I do like using little bits of fluffy yarns, they add interest to the texture but the weaving manages to keep the fluffiness under control!
The next piece is my favourite - the coloured bits are pieces of grass - I was really pleased with how well they worked. This is where I discovered I had holes in my slippers as I kept rushing outside in the wet to get just one more piece of grass...
And the last one I got a bit carried away with the whole using natural materials thing and used some bits of twig - they don't hold together so well so I think I need to rethink the technique for this.
Saturday, 17 July 2010
Making 'Paper' from Vegetables
As promised – but rather overdue, sorry! – an explanation of my paper-from-vegetables process. These instructions are for flat paper - and are not terribly precise since this is definitely an experimental, make-it-up-as-you-go-along type of process... Sometimes it works fine, sometimes you do exactly the same thing and it all goes horribly wrong… but then that's what compost heaps are for!
Equipment : You will need some pressing boards (old shelves work well ), lots and lots of newspaper, and some cloths – I used the cheapest of cheap J-cloths.
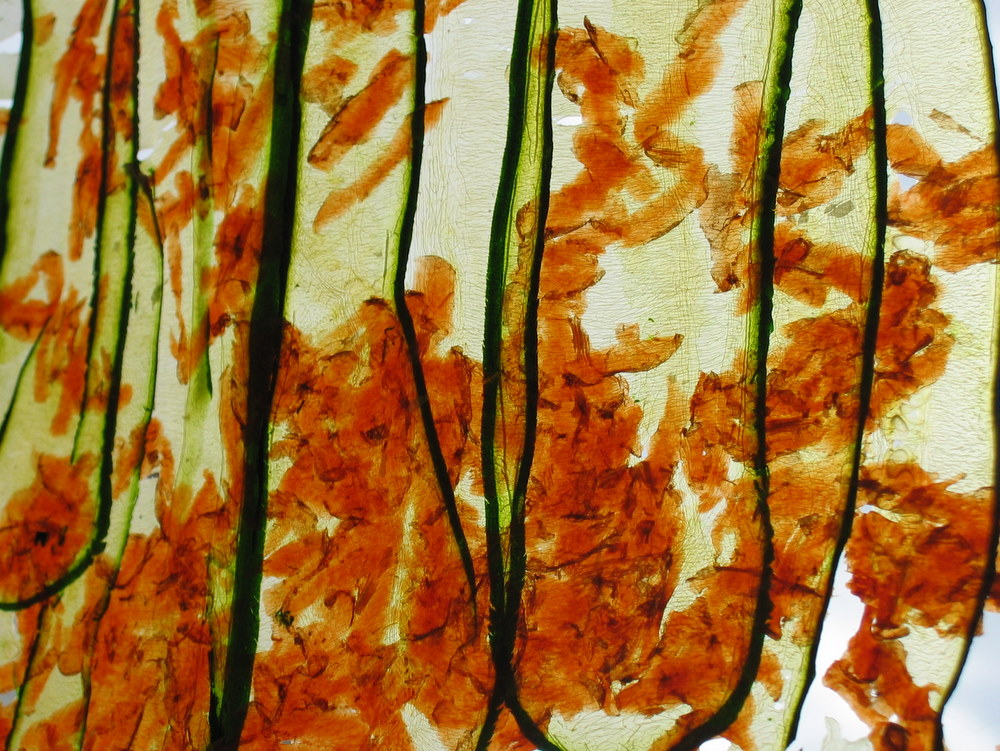
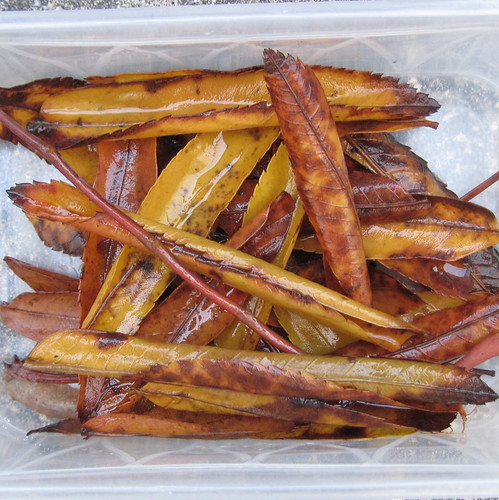
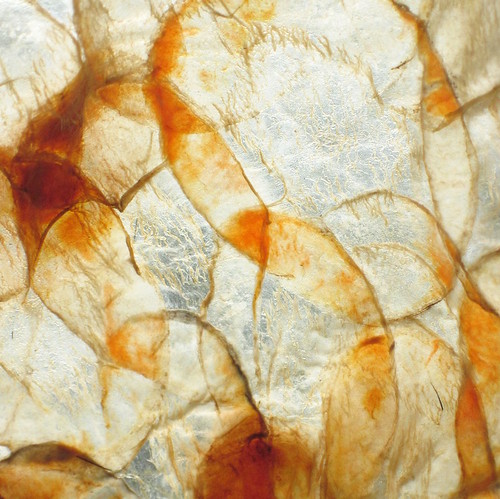
Next, choose your vegetables. I have been most successful with courgette, carrot (sliced or grated), onions and red cabbage (good but smelly!). Leeks and celery can work but are a bit temperamental. I tried a yellow pepper which didn’t work at all, although I think it might if I skinned it first… or sliced it into strips… Anything too watery probably won’t work and shiny skins like that on the pepper are a problem. But there are lots of veggies I haven’t tried yet which will probably work really well – so experiment!
Step 1 : Slice your chosen vegetable whichever way you want. The slices do not need to be particularly thin or even – in fact, slices which are too thin will make your resulting paper terribly fragile. Boil the slices until they are just soft but not disintegrating – how long depends on the vegetable and the thickness of the slices – 3-5mins is about right for most things. Drain.
Step 2 : Lay a cloth on top of a pad of newspaper, on top of a board. Arrange your drained vegetable slices on the cloth, overlapping the slices by about 5mm. You can see from the photograph that the courgette slices were really quite thick. I was making lots of little separate pieces here so I haven't overlapped them much.
Lay another cloth on top and another pad of newspaper on top of that. If you have more vegetable slices you can lay another cloth on top and repeat, topping off with a last layer of newspaper and another pressing board. Weight it all down with a stack of books or whatever else you have to hand.
Step 3 : The vegetables are very wet at this stage, so after an hour or so you will need to replace all the newspaper with dry newspaper. This is important because if you don’t get rid of the moisture your veg will go mouldy before it dries. You can now leave your vegetables pressing for a few hours or overnight.
Step 4 : Your vegetables should be paper thin by now, sticking together and beginning to dry out. Renew the cloths by carefully peeling the top cloth off and replacing with a clean one. Flip the cloth-veg-cloth sandwich over and carefully peel off and replace the other cloth. If you don’t replace the cloths at this stage you may find your veg paper gets irretrievably stuck to them. Restack with fresh newspaper between the pressing boards.
Repeat step 4 a couple of times a day until your vegetable paper is dry. This can take up to 3 or 4 days depending on the moisture content and thickness of the vegetables, how heavy the weights are, and so on.
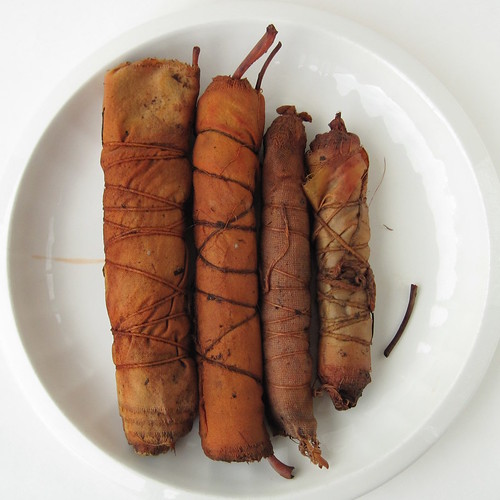
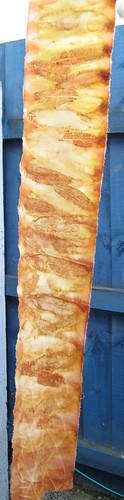
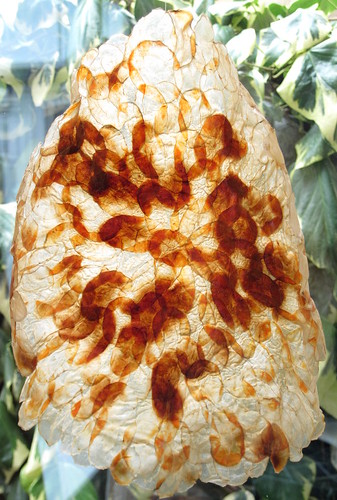
And then you’re done! The vegetable paper can be left as it is, or coated with a sealant such as shellac or acrylic wax. I found the acrylic wax made the otherwise quite brittle paper really flexible, but also very shiny, which I didn’t like so much. Shellac is less shiny and worked really well on the red cabbage but would discolour a paler vegetable. I have no idea how long the paper will last or how long it will keep its colour - I will keep you updated.
So, have fun experimenting, and if you make some vegetable paper, send me a picture, I'd love to see!
Monday, 5 July 2010
Summer Exhibition
Just a quick post to let you know that I will be hanging my veggies tomorrow in my textile group's summer exhibition at Castle Park Arts Centre in Frodsham (Castle Park don't seem to keep their website up-to-date but it's good for directions and opening times!). The exhibition is on from 7th July to 16th August - check the here for opening times. There are loads of lovely pieces in the exhibition - well worth a visit if you're in the area.
And I have been playing with my new camera - discovered a whole new level of zoom so I will have some lovely close up shots of the vegetables to hang as well. Sneak preview here...
Red Cabbage
Onion Rings
Carrot
PS Have you entered my giveaway yet? Ends Wednesday 7th July 9am BST - so don't delay!
Wednesday, 9 June 2010
I have come to the end...
... of my one year foundation diploma in art and design. Even though I am completely exhausted after the frantic trying-to-get-everything-done of the last few days I am sad to have finished it - it was a great experience. Most of the time!
For my final project I have been experimenting with making 'paper' from vegetables. This is surprisingly easy when you are making flat sheets of paper, but much more difficult if you try to mould them into other shapes - so what did I decide to do?
I will write about the process, but I hope you will forgive me if I put that off for another time and just show you some pictures of my little corner of our exhibition - finished with 15 minutes to spare!
courgette - carrot - red cabbage
If anyone will be in Birkenhead at the end of June and would like to visit the exhibition, let me know and I will send you details.
Monday, 17 May 2010
Working Hard
I seem to have slipped a bit with the blog - I have been working hard at my college final project. It is coming along very slowly but I can give you a sneak preview of some of the samples...
'Paper' made from red cabbage, boiled and pressed
Strips of leek, boiled and pressed
Strips of courgette with grated carrot, boiled and pressed
All of these vegetables have dried into very nice 'paper' and it is quite easy to do this flat - it is less easy to coax them into the lovely shapes of my plaster moulds but I am working on it!
Sunday, 2 May 2010
Art with Natural Materials : Marian Bijlenga
I have a passion for art made with natural materials – the more unusual the better. So I was thrilled to come across Marian Bijlenga’s flickr photostream. I was already aware of Marian’s beautiful stitched work incorporating horsehair
But what I really love is her more recent work using fish scales
It is such an unusual and beautiful material – so delicate and translucent, and I love the way the shadows become part of the work. Marian says “For me transparency is a pre-requisite. By leaving some space between the structure and the wall the object is freed from its background and interacts with the white wall. It becomes what I call a ‘spatial drawing’.”
Do take the time to go and look through her flickr photostream – it is wonderful!
Subscribe to:
Posts (Atom)